:grayscale(false):blur(0):quality(80) "Duotone25_Magazin-mobile")
:blur(0):quality(80) "Duotone_Kiteboarding_AcademyApp_Highlight")


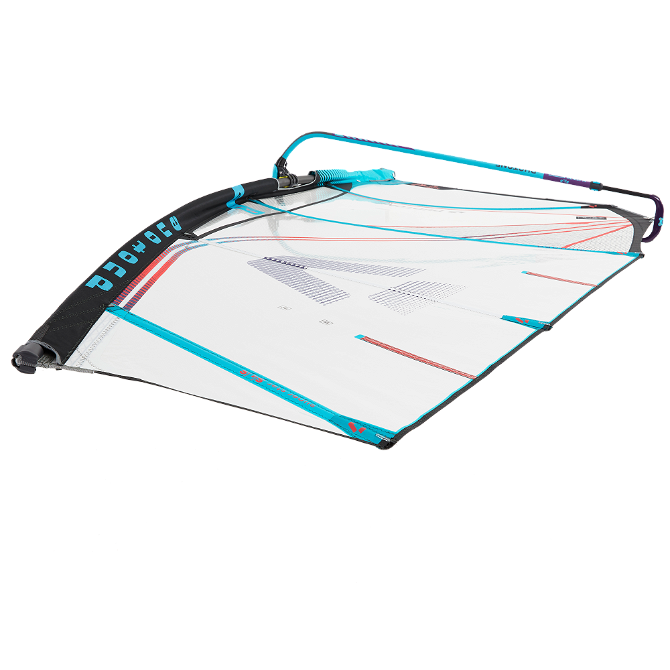
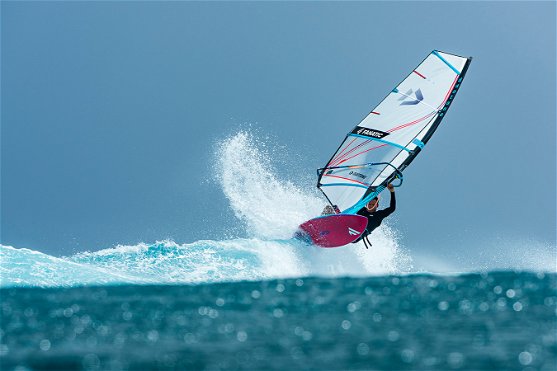
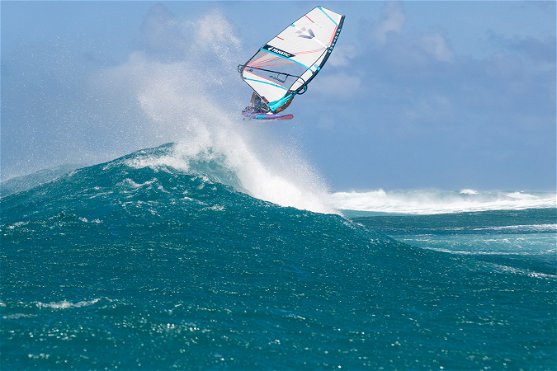
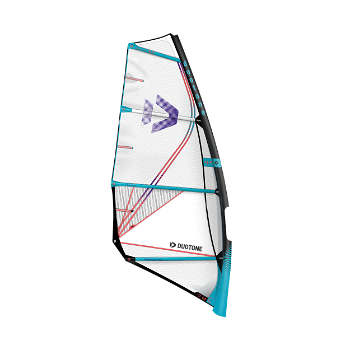
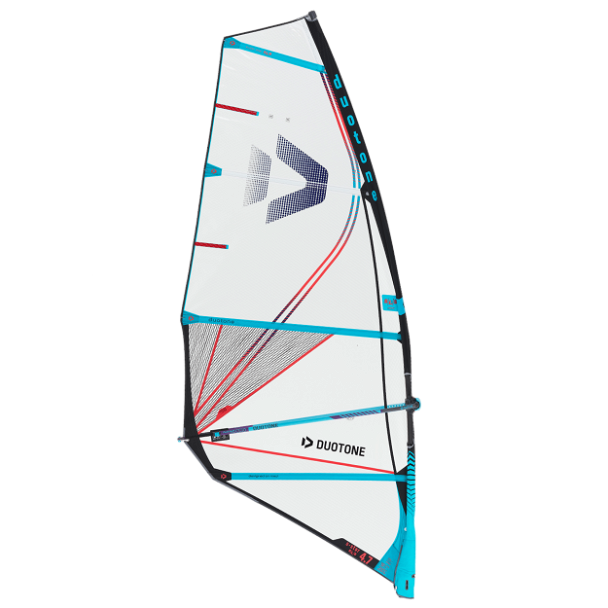
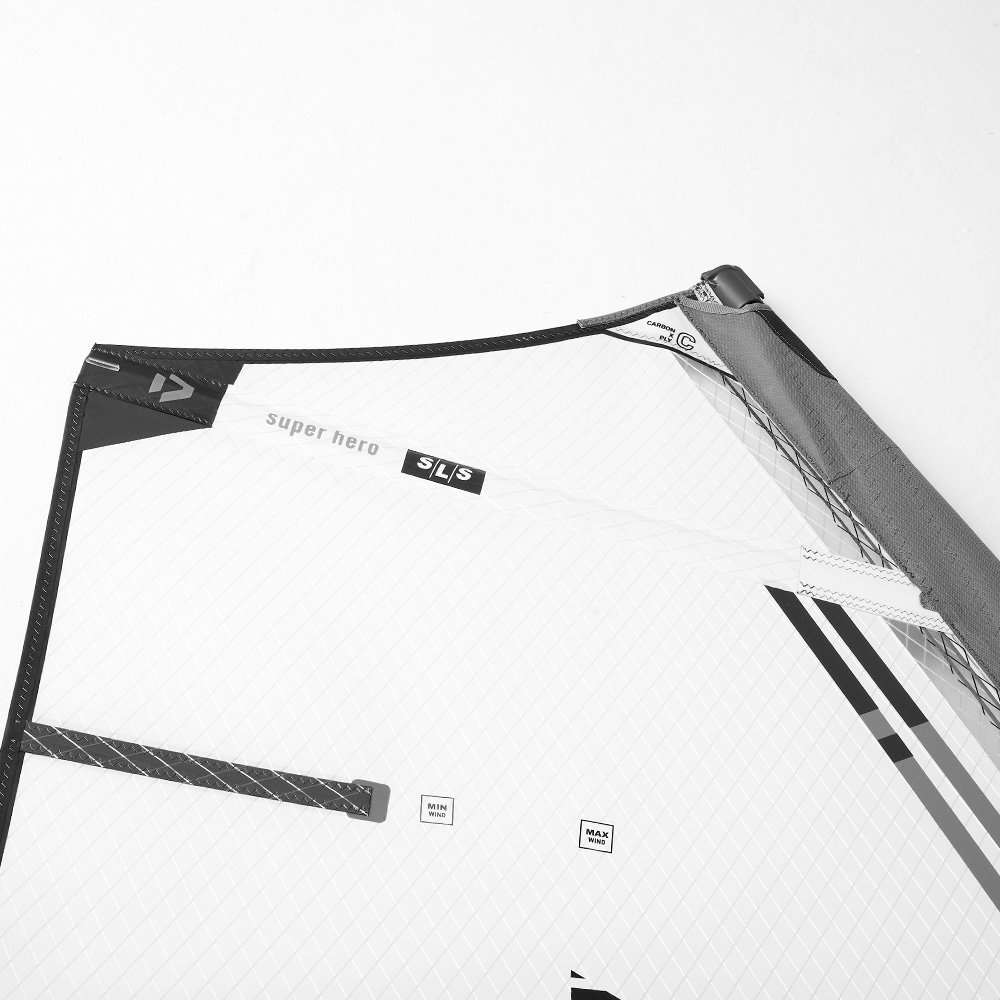
Super_Star SLS 2023
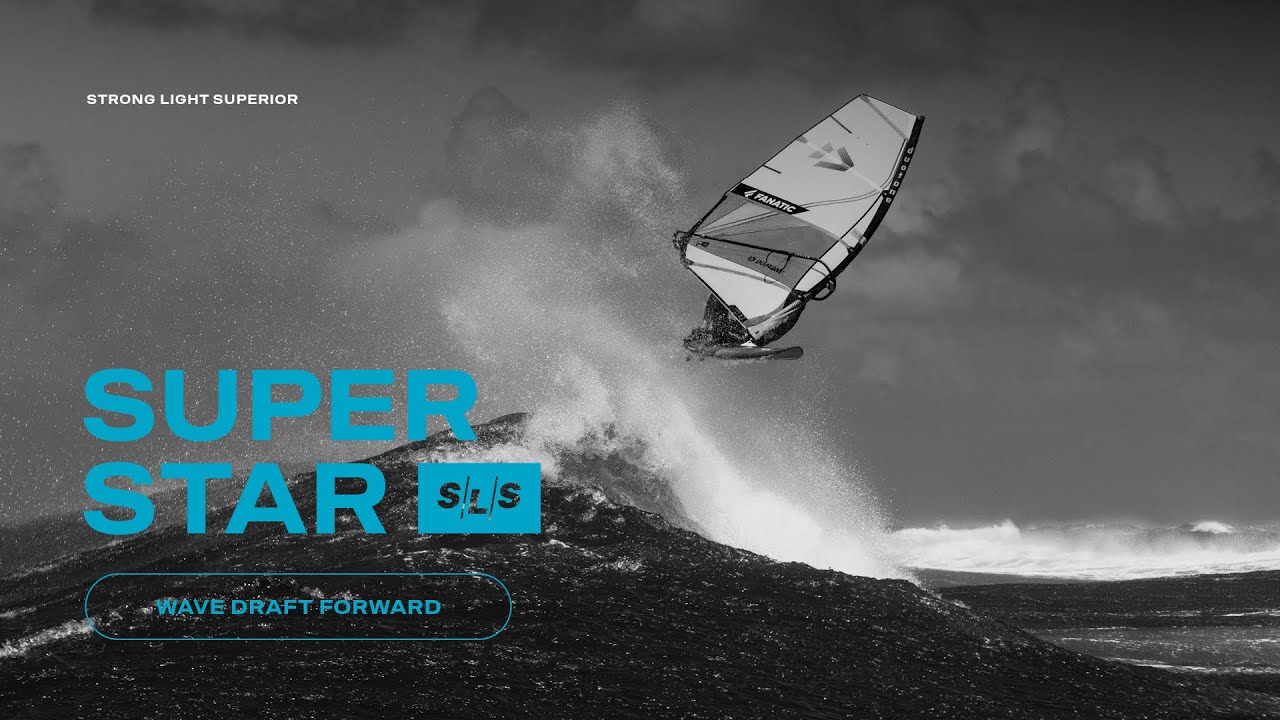
AS LIGHT AS A MEMBRANE SAIL, BUT WITHOUT SACRIFICING DURABILITY/LONGEVITY. WE ARE SO CONFIDENT OF THE BRAND-NEW SLS CONSTRUCTION THAT WE BACK IT UP WITH OUR UNIQUE 5-YEAR WARRANTY. SLS - STRONG LIGHT SUPERIOR!
Your purchase supports
1% for the Planet with €5.82
C05:white


IN SHORT: WAVE SAIL WITH MEMBRANE WEIGHT BUT REFLEXIVE (INSTEAD OF SPONGY) FEELING AND PRECISE STEERING FEEDBACK. OUR UNMATCHED 5 YEAR WARRANTY ENSURES THAT ALL SLS SAILS OFFER THE BEST WEIGHT VS. DURABILITY RATIO ON THE MARKET! ALL SLS PRODUCTS FOLLOW OUR MOTTO: LIGHT DONE RIGHT!
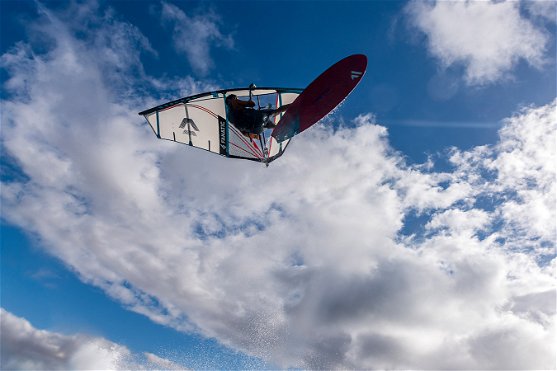
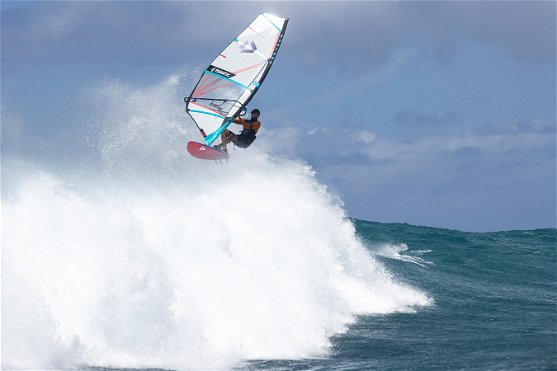
IN SHORT: WAVE SAIL WITH MEMBRANE WEIGHT BUT REFLEXIVE (INSTEAD OF SPONGY) FEELING AND PRECISE STEERING FEEDBACK. OUR UNMATCHED 5 YEAR WARRANTY ENSURES THAT ALL SLS SAILS OFFER THE BEST WEIGHT VS. DURABILITY RATIO ON THE MARKET! ALL SLS PRODUCTS FOLLOW OUR MOTTO: LIGHT DONE RIGHT! What does that mean? We gained an elastic yet reflexive feeling through our design and shaping, rather than using spongy material which are blowing-out (= heavier feeling) such as membranes or laminates. Add to this our unmatched 2+3 YEAR WARRANTY and you really do have a superior product! The SUPER_STAR SLS is our first wave sail that represents the SLS philosophy in an impressive way and inspires technological advances across the board. Never before has a DUOTONE wave sail been so light with such resilience and durability which is why for 2023 it remains unchanged, except for a sleek graphic update. STRIPPED TO THE MAX Reduced to the very essentials, ultra-light and yet durable: with the SUPER_STAR SLS we are fulfilling our own dream of the ultimate, ultra-direct wave sail with state-of-the-art technology. Incredible handling on the one hand through a minimum of parts and weight, yet no sacrifice in durability and longevity and therefore we awarded it the unsurpassed DUOTONE 5-year warranty! At only 2.5 kg (size 4.2), the SLS is as light as a membrane construction, without its enormous disadvantages in terms of durability and “sponginess” profile stability. To make this possible, we have analysed every single detail, no matter how small, and developed numerous optimizations. Simply radically reducing the fabric and film thicknesses - as is usually the case - was never an option for us. Instead, we sought out and developed the highest-quality, extremely resilient and durable materials and fibres that offer advantages for sail performance in addition to weight savings. With the SLS, we are introducing a new CarbonXPly sandwich material that, despite its lightness, directs tension and load forces to predefined points in a more targeted manner and over a larger area. This intelligent mix of carbon and the well-known XPly, in combination with the material properties leaves the sail with a certain flexibility but does not give way under high pressure and distributes it perfectly to both battens, especially in the top. The newly designed mast sleeve and modified reinforcements further reduce the weight. In high-load areas, which previously required several layers of cloth, we now use a single layer of high-strength, extremely lowstretch material with a high-modulus fibre core. The new one-piece mast sleeve is also lighter than previous designs and impresses with a highly dynamic reflex due to the missing seam at the leading edge. Last but not least, even the visuals were included in the weight savings, which is why designer Kai Hopf eliminated all unnecessary graphic elements. As a result, the SLS signals its lightness from afar, its reduction to the essentials and its one hundred percent focus on maximum performance and mega handling. An important note: DUOTONE is the only sail brand to offer two different wave sails: the SUPER_HERO with a centered-low draft position and the SUPER_STAR SLS with a forward-up draft position. Both sails have their own character, ride differently and convey their own feeling. Therefore, you should not mix sails with different draft positions in your quiver, otherwise you will have to get used to them every time you change sails. By the way, this also applies to mixing DUOTONE sails with sails of other brands. Which sails match together or not can be found here.
ATTENTION: since the mast geometry and length (= stiffness) depend on the sail design, size and luff curve the sails will NOT work with any masts outside the recommendations!
WHAT'S NEW
VISUAL FACELIFT
TECHNICALLY UNCHANGED
WANNA EXTEND YOUR 2 YEAR WARRANTY BY ANOTHER 3 YEARS?
THIS PRODUCT IS QUALIFIED FOR AN EXTENDED WARRANTY OF 5 YEARS. TO SECURE THE EXTENDED CLAIMS PLEASE REGISTER WITHIN 30 DAYS.
OTHERWISE JUST THE LEGAL WARRANTY PERIOD CAN BE GRANTED!
PLEASE REGISTER HERE
3D View


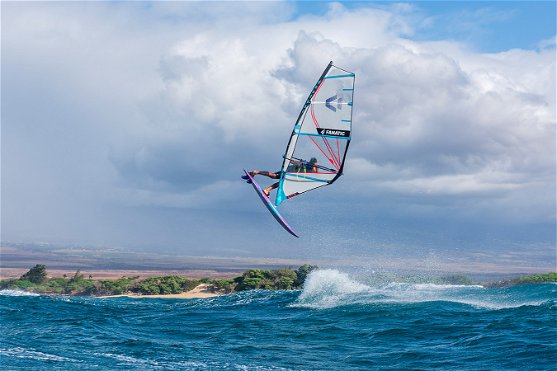
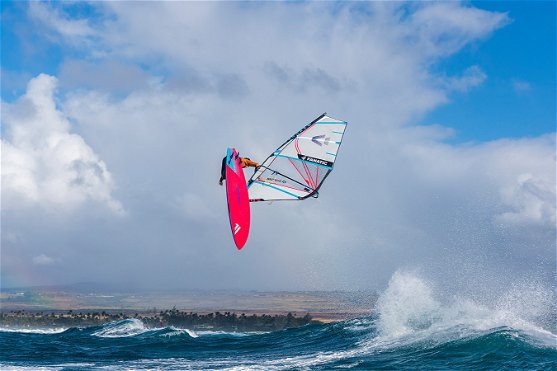
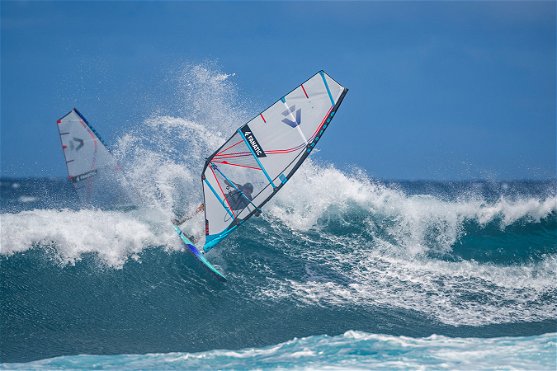
»STRONG, LIGHT, SUPERIOR. THE SUPER_STAR SLS IS OUR FIRST WAVE SAIL THAT REPRESENTS THE SLS PHILOSOPHY. BY INTRODUCING A NEW CARBON XPLY WE WERE ABLE TO REDUCE THE LAYERS IN THE CONSTRUCTION, AS WELL AS THROUGH CLEARING THE OPTICS, WE MADE SIGNIFICANT WEIGHT SAVINGS. NEVER HAS A DUOTONE WAVE SAIL BEEN SO LIGHT WITH SUCH RESILIENCE AND DURABILITY!«

»A LOT OF WORK HAS GONE INTO THE CONSTRUCTION MAKING IT SUPER-EFFICIENT ON MATERIAL. THE GOAL WAS TO MAKE THE LIGHTEST, STRONGEST AND BEST PERFORMING SAIL WE COULD WITHOUT ANY COMPROMISES. WE HAVE STRIPPED EVERYTHING OFF THE SAIL THAT WASN’T COMPLETELY ESSENTIAL TO FUNCTION AND PERFORMANCE. THE SUPER_STAR SLS IS UNLIKE ANYTHING I’VE EVER SAILED BEFORE!«
Reviews
KNOWLEDGE BASE SAILS
BRAND COMPATIBILITY
At DUOTONE we use a Medium Constant Curve for our masts (our bend percentages range between 61-63 bottom and 75-77 top depending on model and length). As this curve sits right in the middle within Constant Curve masts it offers the biggest compatibility of any bend curve. This makes our masts and sails the most compatible on the market.
HERE IS HOW GOOD OTHER BRAND MASTS WORK WITH OUR SAILS AND VICE VERSA:
Challenger Sails, Ezzy, GA (2017 on), Goya, Gun Sails, KA Sails, Loft Sails, Naish Sails, NeilPryde (RDM masts), RRD, S2Maui, Sailloft, Sailworks, Severne (RDM masts, 2014 on)
>> 80-90% (depending on model and size)
Hot Sails, NeilPryde (SDM masts), Point7, Severne (SDM masts, 2014 on), Simmer Style, Chinook
>> 70-80% (depending on model and size)
Avanti, Gaastra (until 2016), Maui Sails, Severne (until 2013), Vandal
>> Not compatible
Most customers change their individual sail and mast sizes according to demand and therefore end up owning a quiver with different brands. When building up your personal sail quiver, you should try to combine sails that have a similar feel and behavior. The one decisive factor defining how similar or different one sail feels/behaves to another is the position of the draft, in both levels, vertical (high><low) and horizontal (forward><back).
Freeride and slalom sails from the different brands nowadays feel quite similar since at least the horizontal draft position is forward oriented on nearly every sail today.
The biggest difference though you find with wave sails.
Basically there are 2 different kind of wave sails:
Draft centered (= balanced pull on both hands) and low (to keep the sail controllable)
These sails are the ideal companion for multi-fin boards. Since the balanced pull on both hands makes them super neutral in your hands they shine especially in real down the line conditions. On the other hand they feel very different to modern freeride and slalom sails (which are very forward pulling). So if you are using such draft back/low wave sails only very occasionally as your high wind flat water sail you might be better off with the second type of wave sails.
Draft forward and up (to still generate enough low end power)
These sails work on both single- and multi-fin boards. With the forward pulling feeling they are more exiting/direct to sail and have a very similar feeling to modern freeride and slalom sails. In addition they are the ideal choice for side-onshore jumping conditions as the higher and forward oriented draft helps/accelerates rotations in the air (especially forward loops).
So when mixing your quiver with different sails/brands you should try to combine sails which have a similar draft position and thus feeling and behavior.
Just follow these guidelines:
You are looking for a direct feeling wave sail especially for jumping. Or you need a smaller sail to complete your freeride or slalom sails. Try to get draft forward/up wave sails. Typical examples are:
Duotone Super_Star / Duotone Duke / NP Zone / NP Combat (until 2018) / NP Atlas / Point7 Salt / Point7 Spy / Severne S1 / Severne Blade
You are looking for a wave sail which is super neutral for down the line riding and very forgiving in nuking gusty conditions. Try to get draft centered/low wave sails. Typical examples are:
Duotone Super_Hero / GA IQ / GA Manic / Goya Fringe / Goya Banzai / NP Combat (2019 on) / Simmer Tricera / Simmer Blacktip / Simmer Icon
Try to avoid combining draft forward/up- with draft centered/low sails in your quiver as these feel and behave extremely different.

DESIGN PHYSICS OF MODERN WINDSURF SAILS
Especially in the top and towards the clew weight is key cause due to the leverage-effect you feel every gram a multiple times in your hands. Because of the quite limited amount of materials available though the only way to reduce the sail weight is by reducing the thickness of the materials. The secret is finding the sweet spot of lowest possible weight but without sacrificing durability and longevity/sustainability.
Modern Windsurf sails consist of the following raw materials:
(1) MAST SLEEVE MATERIAL
Rough woven Polyester fabric. The rough structure gives it a maximum abrasion resistance against impact from the outside (e.g. board contact or contact during rigging) as well as from the inside (through the mast).
(2) MONOFILM
Plastic film made out of Polyester available in clear- or colored versions. This hard plastic film has a very low stretch (for maximum performance) and doesn‘t absorb any water (dry weight = wet weight). Attention: monofilm isn't very UV-resistant. Therefore keep your sail out of direct sun light when not sailing. Also monofilm isn't very abrasion resistant.
(3) XPLY LAMINATE
2 thin layers of monofilm and a pattern of threads (out of Polyester or Dyneema) are glued together creating a sandwich laminate. The additional threads are supposed to function as a rip stop in case the film gets punctured (e.g. falling into the sail with your harness hook first). When using the same total thickness as monofilm (= same low stretch, same UV- and puncture-resistance) XPly is 30% heavier due to the additional adhesive (and threads).
(4) DACRON
Before discovering monofilm original Windsurf sails were made entirely out of Dacron. This woven fabric offers a very good abrasion resistance but is very stretchy plus elongates (means it grows with each use). Therefore nowadays mainly used for reinforcement patches to protect the monofilm and XPly panels in the high abrasion areas of your sail (foot, clew, top and outside of batten pockets).
(5) INSIGNIA
Dacron material with a self-adhesive side. Therefore it doesn‘t require seams when put on top of the film plus prevents water from getting in-between the film and the abrasion patches (= lower wet weight).
Wanna know more details or looking for DUOTONE sail spare parts - here you go

BATTENS
Made out of glass- or carbon fiber either as solid version with smaller diameter (= stronger) or tube version with larger diameter (= stiffer). For a better understanding the mast is like the backbone of your sail whereas the battens act like the ribs of your sail keeping the profile in place. Same as the mast also the battens have individual profiles (thinner tip, thicker tail) matching the profile of the sail.
Simple rule: the more battens the more stable (= faster + bigger wind range) the sail becomes. But also the heavier the sail becomes as battens account for approx. 40% of the sails total weight. Therefore handling/wave-oriented sails usually come with 4-5 battens whereas performance oriented sails usually come with 6-7 battens.
As a second guideline smaller sail sizes require fewer battens than larger sizes.
CAMBERS
Usually there is a certain gap between the batten tip and the mast. This is necessary so that the batten can shift from one side of the mast to the other when sailing back and forth. A camber can be seen as a kind of connection between the batten tip and the mast filling out this gap.
This leads to much better aerodynamics as the cam enables a smooth transition between the thick mast into the thin sail body. In addition since the cam is braced against the mast the batten stabilises the sails profile much more effectively (sail becomes more stable = faster).
The downside is that the rotation from one side to the other becomes much harder. Plus the cambers need a certain space which requires a wider mast sleeve. This makes (water)starting much harder as the wider mast sleeve absorbs more water. Therefore cambers are mainly used on performance Freeride or high-performance Slalom sails.
FOOT ROACH
A sail with a lot of foot roach reduces the gap between the sail and the board (close the gap) which makes it more efficient/performance-oriented.
On the other hand a high cut foot with less foot roach improves the handling especially for all kind of ducking moves.
PROFILE DEPTH
A deeper sail profile gives you more power and performance in general.
A flatter profile on the other hand improves the handling as the distance of the flat profile is much shorter when shifting from one side to the other.
BOOM- AND LUFF LENGTH
Together with the sail size all dimensions increase. Means in general the larger the sail the longer the boom- and luff lengths become.

Simple rule: a heavier sailor needs to take a larger sail size to get planning in the same wind compared to a lightweight.
Rough indication for the biggest sail size: to get going in the same wind a 10 kg heavier guy requires a 1 sqm larger sail.
Max. sail size vs. body weight:
The larger the sail, the heavier and the more “sluggish” the rig becomes. In addition, larger sails require stiffer masts to keep the surface "in shape". A heavy rider provides more "counter-pressure" to the sail area and mast stiffness than a lightweight. That's why the sail tends to pull you out of balance, gets difficult to control during maneuvers and becomes inefficient to pump when it is too large for your body weight.
In relation to your body weight, there is a maximum sail size that should not be exceeded.
Here are some guidelines:
>> 9.0+: min. body weight 95kg
>> 8.0-8.3: min. body weight 80kg
>> 7.0-7.3: min. body weight 70kg
As a general rule rather use a slightly too small than a too big sail.
First you should define the biggest and smallest sail size you will need to cover all wind speeds you wanna sail in. This mainly depends on your body weight (see above).
Let’s take an “average” 75 kg sailor and let’s assume this guy wants to sail in “any kind” of wind.
- The biggest sail size this guy would need is something like a 7.3. With a capable 100-120 litre Freeride board this size would get him planning in approx. 8-10 knots.
- His smallest size would then be a 3.7. On a 70-80 litre (Free)Wave board our guy should be fine up to approx. 40-45 knots.
Second thing is to define the sizes in-between. Important to know: the wind pressure (which you feel in your hands) raises in square in relation to the wind speed. Therefore the smaller the sail size the smaller the size increments need to become. For large sails, the gap can be up to 1.5 sqm, while for very small sails it can go down to 0.3 sqm.
Taking all of this into account a typical quiver for our 75 kg guy could look as following:
7.3 - 6.0 - 5.3 - 4.7 - 4.2 - 3.7
Taking the “10 kg = 1 sqm” rule (see previous point) in consideration a typical quiver for an 85 kg guy could then be:
8.3 - 7.0 - 6.0 - 5-0 - 4.5 - 4.0
You have bought all parts from the same brand but if you rig according to the specs printed on the sail it still feels somehow ackward.
Unfortunately every product has tolerances in production. And the bigger a product becomes the bigger the tolerances become. Therefore tolerances on a smartphone are hardly visible whereas tolerances on Windsurf equipment are non-deniable.
- The tolerances on the mast length are approx. +-5 mm.
- The tolerances on mast extensions and booms are approx. +-3 mm.
Furthermore, there is unfortunately still no standard among brands on how to measure the length of booms and extensions.
- On a sail with all its panels the tolerances over the whole luff length can add up to another +-5-10 mm.
In addition, even with monofilm sails the luff stretches in the first 3 times you use the sail due to the massive downhaul tension.
Adding up all these tolerances you start realising why the absolute numbers printed on your sail (especially the luff length) can only be an indication to adjust your mast extension- and boom lengths.
To achieve the correct downhaul tension please make sure to only rely on the VTS (Visual Trim System) markers in the top of every DUOTONE sail.
Always keep in mind there are exactly 2 things either of them potentially killing at least 30% of your sails performance:
1. The wrong mast (see first point under MAST BASICS on every mast page)
2. Wrong/insufficient downhaul tension
There are 2 things which will destroy up to 60% of your sails' performance:
1. A wrong mast with a bend-curve which doesn't match with the luff curve of your sail
2. A wrong timmed sail
For how to rig and fine-tune your sail please see our YouTube channel.
Always rig according to the rigging instructions - see here.
After use in salt water, rinse or spray down with fresh water. At the very least at the end of a vacation or trip.
When possible only roll up the sail once it has dried. Never store a rolled up sail for any extended periods of time unless it is dry.
To dry, release the tension from the sail; if possible do not set out to dry in direct sunlight, and do not dry it by letting it flutter in the wind.
Always roll the sail from top or bottom, keeping all battens under full tension in their sleeves!
Use only recommended mast components for your sail in order to attain optimum performance.
Do not wash your sail with harsh detergents or chemicals. Water and a mild soap are fine.
Repair tears and holes in monofilm sails immediately to prevent further tearing. If proper repair is impossible (and this includes using the DUOTONE monofilm repair kit), at least seal the tear with normal tape or a sticker.
The sails durability is directly related to
a. the frequency of use
b. sail care and
c. UV-radiation (especially in monofilm sails)
In places with high UV-radiation, store the sail in the shade, otherwise de-rig it.
DUOTONE DESIGN PHILOSOPHIES - THINK DIFFERENT
With the information overkill nowadays no one has the time to read manuals anymore. Therefore we try hard to design our products as intuitive as possilbe to get you onto the water faster than with any other product. No wonder DUOTONE is called the feature world champ.
Here are some examples:
VTS 2.0
The first "guess-free" visual trimming guide to clearly show the correct downhaul tension. Version 2.0 comes with a window in the protector to mark your individual trim once you have found your ideal setting.
HTS 2.0
By marking the draft position on the sail you immediately know where to position your harness lines.
INDIVIDUAL BOOM LENGTH INDICATION
The length of the boom changes with the angle to the mast. Therefore if you move your boom up or down you need to change the length of your boom. As the only brand we take that in consideration by printing 3 different boom lengths onto the clew and boom cutout so that you always know the correct length according to your body/boom height.
SET&GO VARIO-TOP
Instead of leaving you with the time-consuming try and error procedure to find the correct setting we have installed markings on the webbing immediately showing the correct setting.
iROCKET 2.0
Every batten in a sail requires a different tension. That's why as the only brand we calibrate every single batten at the factory to the correct individual tension using a torque wrench. Since the screws are locked with screw glue you never have to touch them. Just rest asured to always have prefect batten tensions.
Our motto is clear: light is right but only if it doesn't go to costs of durability.
Our hardware products (booms, masts and extensions) are proven to be the lightest in the industry.
With our sails though we are not the lightest on the market (with the exception of the Super Hero M.Plus). The major reason for this is that we are using (much) thicker XPly laminates than some other brands.
The factors of puncture resistance, UV weathering resistance and stretch evidently depend ONLY on the thickness of the film used.
Puncture resistance and stretch have a linear relation to the thickness of the film. Means twice the thickness results in twice the strength against punctures with half the stretch.
Even more critical is UV resistance since here the relation to the thickness is overproportional. Means half the thickness reduces the UV-longevity by nearly 70%!
Some brands use XPly laminates which are 2/3rd thinner than ours in the upper sail area. Yes in the top you have less puncture issues and you can even get away with the increased strech. Unfortunately though the UV-exposure is the same all over the entire sail.
That's one of the reasons why the majority of Windsurf centres around the globe trust in DUOTONE products.
Eliminating stretch and loss of tension. If it’s good enough for safety belts, it’s good enough for windsurfers! We are the only manufacturer to use only polyester webbing for the (vario) top and the tack roller. This advantage of this compared to conventional polypropylene is the negligible amount of stretch. As a result even brand new sails will retain full luff tension and will not need subsequent trimming.
On modern wave sails you want to have a certain elasticity. The easiest way to „inject“ elasticity into a sail is by using Dacron for the luff panel.
Dacron has 2 disadvantages though:
Dacron is a rather soft woven fabric. Therefore it has a lot of give but similar to your t-shirt it wears out over time. Means your sail is permanently getting fuller in the luff panel. Especially under permanent downhaul tension (e.g. in surf centres) Dacron ages very fast.
The Dacron material improves the elasticity but due to the soft Dacron material it’s kind of a spongy softness. On the water such sails often have the tendency to become unbalanced on the wave and less precise during jumping.
Therefore Kai designs his wave sails with non-stretchy XPly luff panels. Instead he tries to implement elasticity into the sail through other design features. Starting with 2022 all no-cam sails feature a mast sleeve made out of one single piece (ONE PIECE SLEEVE) instead of the common two piece construction. Besides saving weight this eliminates the hard spot at the leading edge caused by the overlapping + reinforcement and the seam to connect the two pieces. This way the whole sleeve becomes an integral part of the mast flex/twist. We call this PRECISE ELASTICITY.
WE DO CARE
Sustainability is the most important and pressing challenge of todays mankind to secure a livable mother earth for future generations to come!
Over the last 50 years Windsurfing has developed into a super high tech sport. But let's face it despite what others might tell you with the exception of aluminium booms and extensions Windsurfing products are a "mixture of petrol-based plastic trash". And most times up to 100% of this plastic trash are non-recycled (means "freshly produced") plastics.
At least as of today there are no eco-friendly substitutes existing offering the minimum requirements necessary to design modern Windsurfing products. Or why do you think no one wants to sail with wooden booms, aluminium masts or stretchy sails made of woven fabrics anymore?
There is only one sustainable way out of this dilemma:
MAKING LONGER LASTING PRODUCTS (LONGEVITY = SUSTAINABILITY)
A high performance product that lasts longer and best case can even be put into additional use on the second hand market is the best and only way to conserve the resources of our earth.
Of course light components have a massive impact on the performance and handling of your rig. That's why light weight is always on our briefing list when designing and engineering new products. And DUOTONE products are among or in many cases are the lightest on the market.
But durability and longevity were and will ALWAYS be on top of our priority list. Our industry leading warranty extensions bear witness to this philosophy:
- 2 year unconditional warranty on almost every hardware product (masts, booms and extensions+bases).
- 5 year warranty on 80% of our sails.
On sails we cannot emphasize enough that especially reducing the thickness of the monofilm and the XPly laminate has a radical influence on the longevity/sustainability. Reducing the film thickness by 50% reduces the UV-stability by 70%. Just to shortterm impress magazine testers or customers some brands use up to 70% thinner laminates/films than we do. This is not our understanding of sustainability.
DOING MORE
However, since we are fully aware of the importance of sustainability, we cannot simply stop here.
>> Only we have stopped using any plastic for packaging our sails. This saves approx. 5 sqm of plastic film and foam per sail.
>> Only our aluminium products (booms and extensions+bases) are manufactured in a CO2 neutral production facility.
>> Only our aluminium products (booms and extensions+bases) are produced in Germany using 100% European raw materials in order to keep shipping distances (to our manufacture and then to our central warehouse) at a minimum.
>> Only our sail bags are made out of 100% recycled plastic.
>> Only we compensate all carbon emissions caused by our sails during manufacture and transport by supporting a hydropower carbon offset project in Sri Lanka, the country where our sails are produced.
WE DO LISTEN - BECOME PART OF THE DUOTONE DEVELOPMENT
DO YOU HAVE ANY INPUT OR IDEAS ON HOW TO IMPROVE OUR PRODUCTS?
SHARE YOUR THOUGHTS WITH US!
We strive to create products that are superior in performance and function to anything else on the market. Therefore, we are not just interested in the opinion and experience of professional riders, but listen to ALL windsurfers out there. Because we know we can learn from everyone, we want to collect the opinions of windsurfers worldwide.
This project runs throughout the whole year. Every year on January 15th, the best ideas will be rewarded and might actually be implemented into future products.
So, you have got an idea? Contact us >HERE< and take your chance to make a difference. (Please use "R&D input for DTW" as a subject line)
REWARDS
1st - One sail (free of choice)
2nd - One Silver Boom (free of choice)
3rd - One Power.XT 2.0 (free of choice)
